ShopDreamUp AI ArtDreamUp
Deviation Actions


Suggested Deviants


Suggested Collections


You Might Like…


Featured in Groups


Description
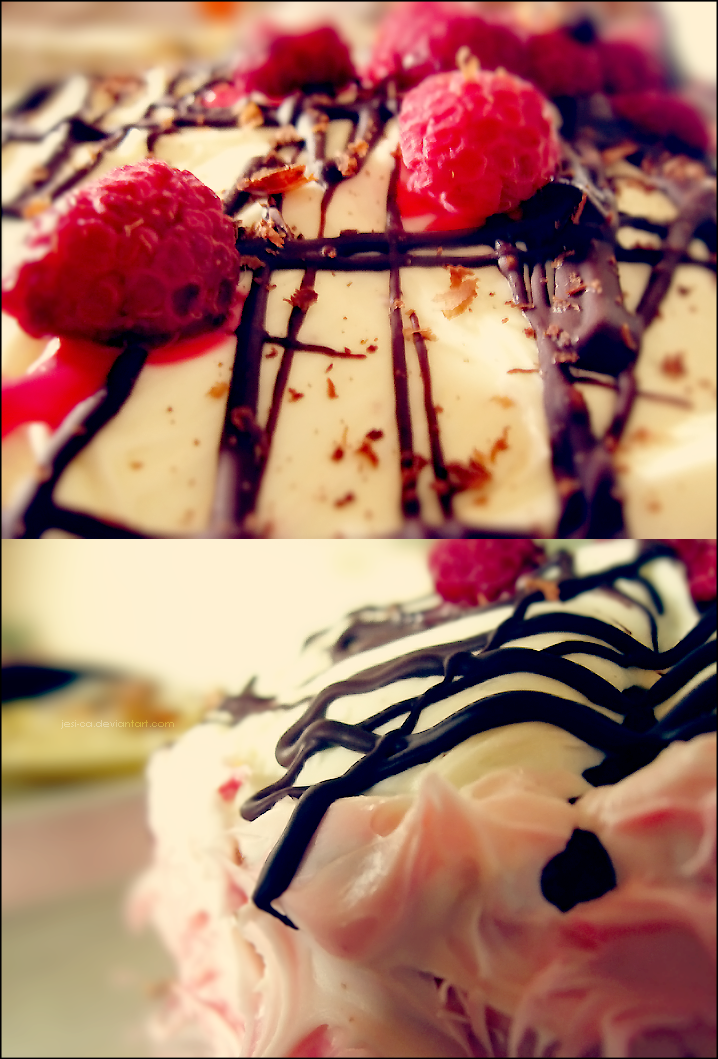
This is the cake I made my mother for her birthday, which I dubbed "Blood and Chocolate". It's a raspberry chocolate cake made from scratch...Well, not the icing >:3
Anyway, the outside is a mix of white and pink icing drizzled in melted chocolate, chocolate shavings and fresh raspberries. The inside is a regular chocolate cake but I made it in two layers, so there is raspberry creme in the middle. The cake got an "A+" from the family - and my mom was pleasantly surprised!
A new thing I do for my friends on their birthdays...I make them cakes!
The recipe for this cake is as follows:
Okay, so...You wanna know how to make cake? Well, here
PREHEAT YOUR OVEN TO 350 DEGREES (Fahrenheit) AND GREASE THE TWO PANS.
Ingredients:
1/2 cup of butter or margarine (butter makes the cake better, but use what you wish)
2 1/4 cups of brown sugar; lightly packed
3 eggs
1 1/2 teaspoons of vanilla
2 teaspoons of baking soda
1/2 teaspoons of salt
2 1/4 cups of sifted flour
1 cup of dairy sour cream (I know, it sounds gross. But it's not...trust me xD)
1 cup of boiling water
2 Nine inch round pans.
1. In a large mixer bowl, cream butter until smooth.
2. Next, add the eggs* and brown sugar.
*crack the eggs over a separate cup in case you get an egg with blood spots or accidentally get some shell in it*
3. Beat the mixture together for about five minutes or until it looks light and fluffy.
4. Then, add the vanilla, chocolate, baking soda and salt and mix it with your mixer on a low speed.
5. While mixing, gradually add in flour and sour cream until it is all used up. Don't just dump it all in...The flour will go everywhere, lolz. Mix it with the mixer until the whole thing is nice and smooth and there are no huge chunks of anything left in there.
Alternatively, if you do not have a mixer, you may also blend the ingredients together with a rubber scraper or wooden spoon. This would require more time and more effort...But the cake will still be the same.
6. Once the mixture is smooth, remove the bowl from the mixer and add in the boiling water. Stir it again until it is well blended.
7. Leave the mixture in the bowls!!! Do not pour it into the pans yet!!
This is very important: Before you pour the cake batter into the pans, take wax paper and divide it into two sheets - two sheets that you know will fit into the two cake pans. Make sure that not too much is sticking out over the edge of the pans, and if that happens just cut the excess off with scissors. Make sure that some wax paper is left though...You'll need this to remove your cakes after they are done baking. Grease the wax paper once it is laid in the pan. Then, take the batter and divide it into each pan so that there is an equal amount in each.
Hooray!! You've made the batter!! Haha, one step closer to being the new Ace of Cakes! Let the cakes in the oven for about 35 minutes. Keep checking on them with a toothpick and looking at them while they are baking so they don't burn!
This is probably one of the easiest parts of the recipe because it involves two things, really.
Ingredients:
1 tub of white icing
1/2 cup of raspberries
1. Take the 1/2 cup of raspberries and put them in a ceramic cup. Smash them into a pulp with a wooden spoon or something of the sort. Until they are all pulpy or runny, don't stop smushing them xD
2. Once they are all squished up, dump them into the icing.
3. Mix it! Honestly, that's all you do. If you want the colouring to be more pink or red (if the raspberries themselves don't colour it enough for you already), add some red food dye to make it look more pleasing to the eye ;D
Before we progress any further: Check your cake!! If it is done, make sure you take it out of the oven and let it cool. Once it is done cooling, use a butter knife to "cut" around the edges where the cake meets the wax paper. Gently remove the cakes and lay one on a cookie sheet (or a round cake platter...you know, those nice ones for serving and such) flat side down. Take the raspberry filling and spread it evenly on top of the cake. This will serve as that filling you see in those fancy-pants layer cakes so don't icing the ENTIRE cake! Although, you probably knew that already. Place the other cake on top of that one, flat side down. Then, proceed to ice the whole cake with white or pink icing (or like me, you could make the sides pink and the top white). It's whatever you prefer!
What's a cake without garnishes? They make the cake look pretty and almost too good to eat
Ingredients:
4 squares of semi-sweet baker's chocolate
vegetable peeler
microwavable container
ziploc baggie
raspberries (there's no set number...use what you like)
1. Take three of the four squares of baker's chocolate and place them in the microwavable container. Microwave the chocolate at increments of one minute. Make sure not to scorch the chocolate and to stir it after every minute. It's okay to have a chunk or so of chocolate remain; it can easily be crushed into a liquid. Which, makes no sense, but it can |:< The other square, place it in a refrigerator or a cool place. You'll need it later!
2. Pour the warm, melted chocolate into a ziploc baggie and try to move it all down to one corner of the bag. Then, with a pair of scissors, cut a small hole on the corner of the bag. This is for those lame people who don't have any of those icing decorator things. So...We improvise and make our own! If you have one of those nifty decorators, you may use them too.
3. Use the chocolate to write on, make drizzles or just plain decorate the cake. In my case, I drizzled the chocolate and chocolate drizzles are a flattering accent to and cake or dessert.
4. Once you have chocolatized you cake to your heart's content, have in hand your vegetable peeler and the last of the four chocolate squares. Gently scrape the flat side of the chocolate with the vegetable peeler. You can either do this right over the cake or collect the shavings in a little dish and sprinkle them on yourself.
5. Decorate with chocolate! And then, take some raspberries and place a few in the center (like mine) and a few scattered to give the appearance that the raspberries are cascading down the cake. Or if you did something else with your cake, place them in a way that looks appealing.
There you go! That's my "Blood and Chocolate" cake down to it's creamy core...I hope you'll have fun making this cake and it can be used for several occasions! Feel free to be more creative with this recipe...Tell me what you think and tell me what you did! Yay, cake!
Image size
718x1059px 970.92 KB
Comments16
Join the community to add your comment. Already a deviant? Log In
Wow that looks yummy!